1. What is git?
Git is a version control system. It records every change to your code and lets you go back to any earlier version at any time.
Think of it as the version history of Google Docs, but for code. Every saved version (a commit) is a snapshot of your whole project that you can bring back at any time.
Why we use git
- Traceability: who changed what, and when?
- Safety: mistakes can be undone.
- Teamwork: several people can work on the same project at the same time.
- Backup: the code is kept safe on GitHub (the remote).
Local and remote
2. Key terms
The terms you will meet most:
+
next to a file.
main. In this course everyone works directly on main.
.venv/, __pycache__/).
3. Using git for the first time
Before you can pull, commit and push, a few steps are needed once. This is the order for the first start on your laptop.
-
1
Install git
Install git once on your computer. On Windows that is usually the installer from
git-scm.com, on macOS the Xcode Command Line Tools or Homebrew. -
2
Set your name and e-mail
You do this once per computer. Git writes them into your commits, so that it is clear who changed what.
git config --global user.name "Your Name" git config --global user.email "the e-mail of your GitHub account" -
3
Clone the repository
The easiest way is in VS Code. Open your repository on GitHub and copy its address with the green Code button.
-
In VS Code, open the command palette with
Ctrl+Shift+P. -
Search for
Git: Cloneand press Enter. - Paste the address from GitHub and press Enter.
- Choose where on your computer it goes: the folder that should contain the repository. Git creates a new folder for it there.
- Then click Open, so that VS Code opens the cloned folder.
You clone once per project. Then you have a working copy on your laptop, connected to GitHub, which git calls
origin. -
In VS Code, open the command palette with
-
4
Check that VS Code sees the repository
With the folder open, VS Code finds the git repository on its own. The Source Control view lists your changes, and the bottom left shows the branch,
main.
git config --global ...
Git: Clone in VS Code
4. The git workflow
Once the repository is cloned and open in VS Code, this is how working with it goes. Each step takes your changes one step closer to the shared repository.
5. Git in VS Code
VS Code has git built in. These are the parts of its window you will use.
5.1 The Explorer: your project files
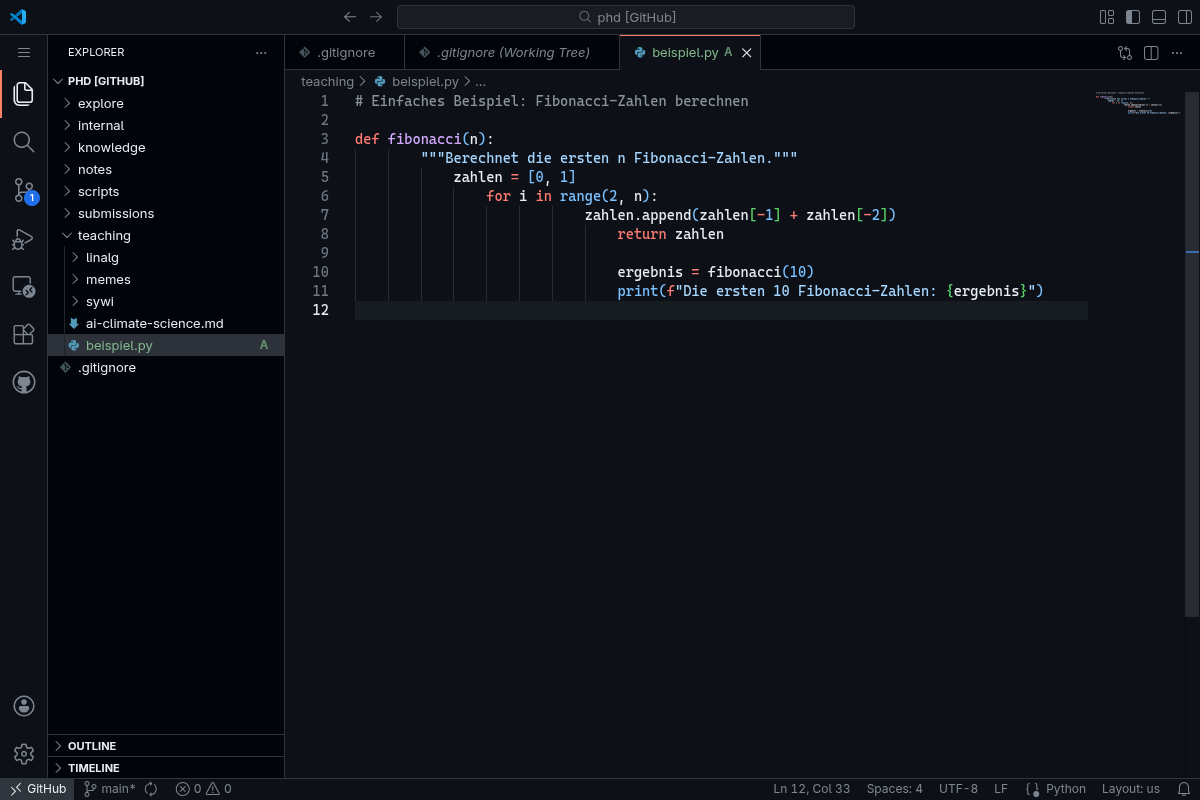
The Explorer (on the left) shows all files of your project. Files that were changed, added or deleted carry a letter:
-
A= Added (a new file) -
M= Modified (a changed file) -
D= Deleted (a deleted file)
5.2 Source Control: the git view
Click the Source Control
icon in the sidebar (the branching icon),
or press Ctrl+Shift+G. It lists all your changes, and you commit from there.


main) and whether there is something to sync.
5.3 Committing changes, step by step
-
1
Write and save code
Edit your files as usual. Changed files appear in the Source Control view under "Changes".
-
2
Open Source Control
Click the Source Control icon in the sidebar or press
Ctrl+Shift+G. -
3
Stage your changes
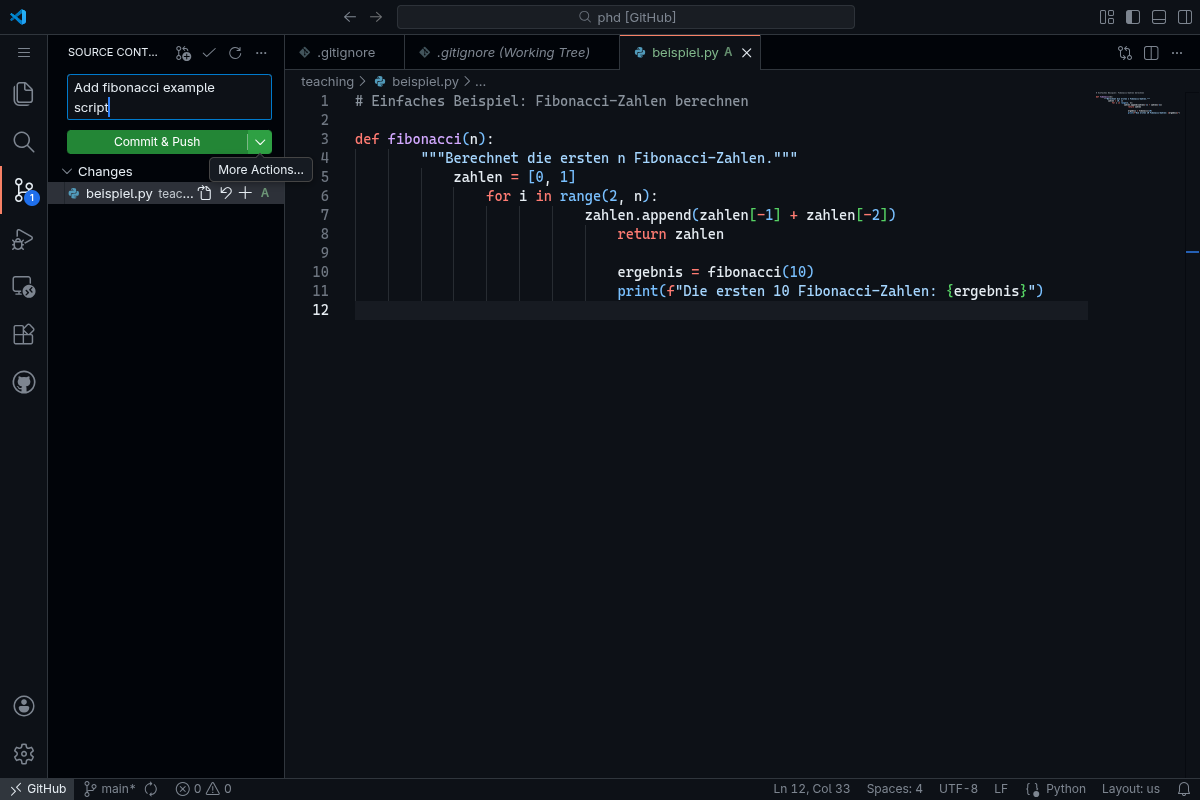
Click the
+next to each file you want to commit (or the+next to "Changes" to stage them all at once). The files move from "Changes" to "Staged Changes". -
4
Write a commit message
Type a short description of what you changed into the text box. For example:
Add fibonacci example script -
5
Commit & Push
Click "Commit", then "Sync Changes" (or "Commit & Push" if it is offered). Your changes are saved and uploaded to GitHub.
5.4 Comparing changes (diff view)
Click a changed file in the Source Control view to see its changes in the diff view: the old version on the left, the new one on the right. Green lines are new.
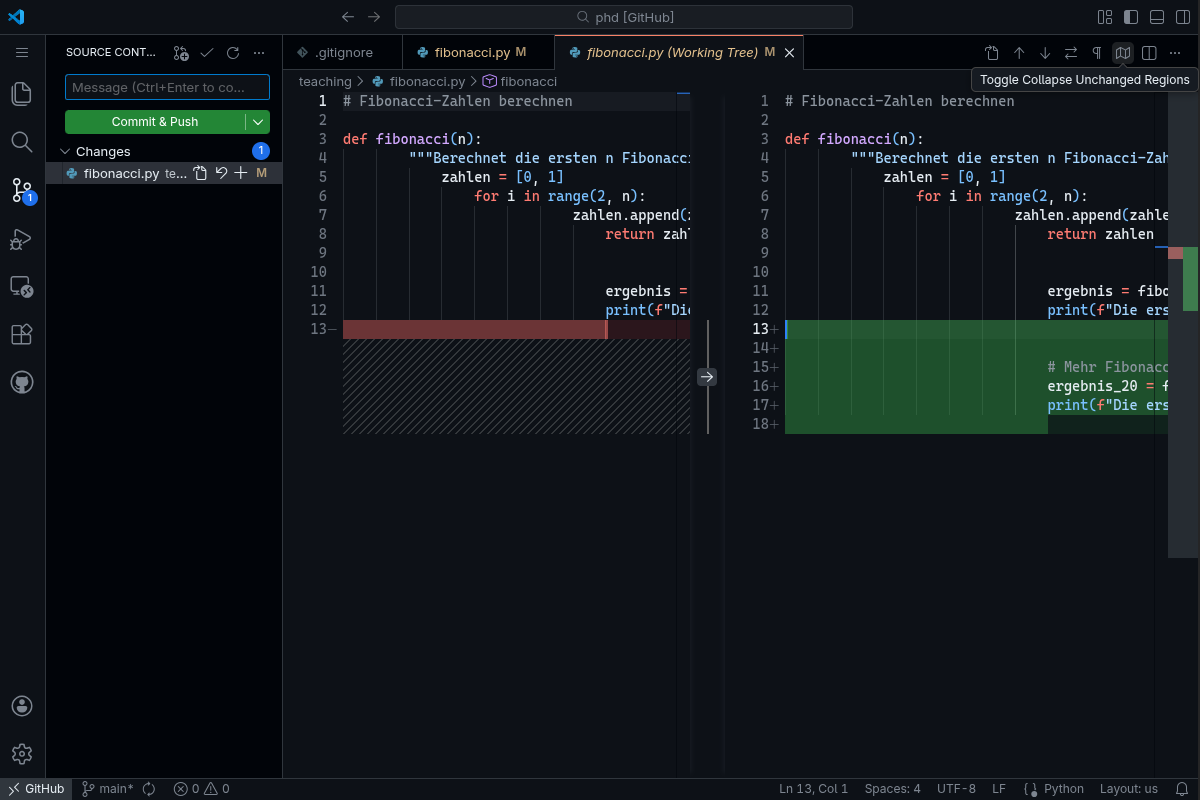
fibonacci.py: the original on the left, the edited version on the right. The new lines (13 to 18) are green.
6. Working in a team
Your team works on one shared repository on GitHub, and everyone pushes directly to the
main
branch. That is the simplest workflow, but it needs you to agree who does what.
Always pull first.
Before
you start working, get your teammates' latest changes
with pull
(in VS Code: the sync icon in the status bar, or
Ctrl+Shift+P
→ "Git: Pull").
Otherwise you risk merge conflicts. On the very first start of a project, though, the first step is clone, not pull.
Every time you work on the project
- 1 Pull · get the latest changes
- 2 Write code · work on your files
- 3 Test · check that your code works
- 4 Commit & Push · save your changes and upload them
Talk to each other. Agree who is working on which file. When two people edit the same file at the same time, conflicts can follow.
7. Resolving merge conflicts
A merge conflict happens when two people changed the same place in a file. Git cannot know which version is right, so it asks you to resolve the conflict.
When does it happen?
You pull the latest changes, and git finds that someone else
edited the same line as you. VS Code then shows the conflict in the Source Control view:
the files concerned are marked with a
C
(conflict).
In a terminal, like the git sandbox
Git writes both versions into the file, between marker lines:
<<<<<<< main
your line
=======
your teammate's line
>>>>>>> origin/main
Open the file, keep what should stay (often both lines), and delete the three marker lines. Then stage and commit the file as usual: that commit finishes the merge, and you can push. The commands are in section 8.
In VS Code, with the merge editor
-
1
Open the file with the conflict
Click the file with the conflict in the Source Control view. VS Code shows a yellow notice at the top: "This file has merge conflicts".
-
2
Open the merge editor
Click "Resolve in Merge Editor" in the notice. A three-way view opens:
- Top left (Incoming): your teammates' change (from GitHub)
- Top right (Current): your own change
- Bottom (Result): the result: what the file will look like
-
3
Choose the changes
For each conflict, a checkbox decides:
- Accept Incoming: take the team's version
- Accept Current: keep your own version
- Both: tick both checkboxes, and both changes go in
The result shows up at the bottom (Result), where you can still edit it by hand.
-
4
Click "Complete Merge"
When the result is right, click "Complete Merge" (bottom right of the merge editor). The file is marked as resolved.
-
5
Commit
Once all conflicts are resolved, commit in the Source Control view. VS Code suggests a commit message (for example
Merge branch 'main'...). Click "Commit" and then "Push".
Tip: always read the result at the bottom (Result) carefully before you click "Complete Merge". Make sure the code makes sense and nothing is missing.
No panic. Merge conflicts sound worse than they are. VS Code's merge editor makes them easy: you see both versions side by side and click what should stay. If in doubt, ask your team.
8. Important git commands
In the projects you will mostly use VS Code's buttons, but these are the commands behind them.
You type them in the terminal of the git sandbox, or in VS Code's terminal (Ctrl+`).
| Command | What it does | In VS Code |
|---|---|---|
git config --global user.name "..."
|
Set your name for all your commits | Once, in the terminal |
git config --global user.email "..."
|
Set your e-mail for all your commits | Once, in the terminal |
git clone <url>
|
Download a repository from GitHub |
Ctrl+Shift+P → "Git: Clone"
|
git pull
|
Get the team's latest commits from origin and merge them into yours | Sync icon in the status bar |
git add <file>
|
Stage a file for the next commit |
+ next to the file
|
git commit -m "msg"
|
Save the staged changes as a commit, with a message | A message, then the Commit button |
git push
|
Send your commits to origin | "Commit & Push" or the sync icon |
git status
|
Show which files are changed or staged | Source Control view (sidebar) |
git log
|
Show the history of commits (with --oneline, one line each)
|
Timeline (bottom of the Explorer) |
git diff
|
Show the changes line by line | Click a changed file: diff view |
In the git sandbox,
edit <file>
opens a file in its editor.
That one is the sandbox's own command, not git's.
9. Golden rules and common problems
The golden rules
update
but
Add data loading for experiment 2
__pycache__/, .venv/, large data files). The .gitignore file keeps them out.
Common problems and what to do
The push is rejected:
Why:
someone pushed before you, so your copy is behind. What to do:
first git pull
(or Sync in VS Code), resolve a merge conflict if there is one, then push again.
"I worked on the wrong branch":
In this course everyone works on main, so this should not happen.
Check that the status bar (bottom left) says main.
"I committed something by mistake": No panic: undo the change in the file and make a new commit. Git keeps everything, so you can always go back. If in doubt, ask your lecturer.